Windows is the most popular and the most used operating system. Due to its simple and intuitive user interface, people from all study backgrounds would feel comfortable using it. Although the latest version Windows i.e.., Windows 10 functions smoothly on compatible devices, sometimes the performance of the system would get slower due to some bugs. In order to speed up the performance of the system, you would have to uninstall the present OS and reinstall it.
But! The challenge is when you try to uninstall the present OS; you might lose the data and files stored in the system. Data backup and restore are not guaranteed when you uninstall and reinstall the Operating System on your PC.
In order to prevent data loss, you need to back up files on the cloud by using cloud storage services such as Google Drive, Dropbox, or OneDrive. You can also take a backup on another system. But, doing this would double your work because again you would have to save files on the new OS.
To help you reduce efforts, Microsoft has been helpful and released a tool that helps you achieve easy data backup and recovery. The tool is called Windows Media Creation Tool.
Firstly, let us now try to understand this tool!
What is Windows Media Creation Tool?
Windows Media Creation Tool is a tool released by Microsoft which helps you restore the files when you reinstall the OS on your PC. This tool also helps you download a Windows installation file onto a DVD or Flash drive.
To use this tool, you should have a licensed version of Windows 10 OS on your PC as a prerequisite. You can use this tool when you have to reinstall the Windows 10 OS on an already activated Windows 10 OS or you can use this tool when you have to upgrade OS on your PC from Windows 7 or 8.1 to Windows 10 having a license to install Windows 10.
But! Before you run Windows 10 on your system without any errors, you have to make sure that your PC satisfies the system requirements to install Windows 10.
Here are basic system requirements to install and run windows 10 on a PC:
- 1 GHz or faster processor or system on a chip.
- 1 gigabyte (GB) RAM for 32-bit or 2 GB RAM for 64-bit.
- 16 GB Hard drive disk space for 32-bit OS or 32 GB Hard drive disk space for 64-bit OS.
- DirectX 9 or later, with WDDM 1.0 driver.
- 800×600 Display.
If you cannot get all the details directly on your PC, you can visit the manufacturer’s website to get the accurate details of the system specification you are using.
During the installation on Windows 10, make sure to have high-speed internet connectivity, so all the available updates get installed. If it fails to happen, broken files get installed which could cause bugs and errors during usage.
Now that we have understood what a media creation tool is, let us see how to download the tool and use it.
How to download Media Creation Tool
Visit the official Microsoft page to download Media Creation Tool,
Step 1: Click on Download tool option present on the screen, and select Run. Note: To perform this activity and run the tool, you should be an administrator of the system.
Step 2: In the next step, you get to see Accept option on the License terms page. If you accept the license terms, click on Accept.
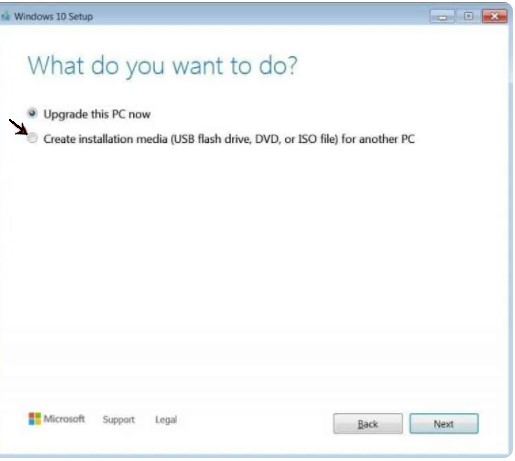
Step 3: Further, you would see What do you want to do? page, now click on Upgrade this PC now, and then click on Next option.
Now the tool will start to download. Once downloaded, you can install it on the system. After complete installation, you can see the guide on how to set up Windows 10 on your PC for different versions.
Follow the steps mentioned to be performed for the Windows 10 version you want to download. When it is set to install, you’ll see a recap of what you have chosen, and what will be kept through the upgrade. You will be given the option to Change what to keep, you can choose whether to keep both personal files & apps, or Keep personal files only, or you can choose to keep Nothing during the upgrade.
Now you can save and close any of the open apps and files running in the background, and when you are set, click on Install.
Note: If you want to upgrade to Windows 10 and you don’t have a license to install it, you can purchase a copy of it here.
If you are already using a licensed version of Windows 10 on your PC and you are just reinstalling it, you don’t have to enter a product key. Windows 10 will automatically get activated later with your digital license.
It would take some time to install Windows 10, and your PC will restart a few times. During the installation, you have to ensure that your PC doesn’t turn off.
Media creation tool also helps you to create a Windows installation file onto a DVD or Flash drive using which you can install Windows on different PCs.
The process to do it is quite similar to the Windows upgrade process explained above. Except that you have to select installation media for another PC in step 3.
drive or ISO file (to store on DVD). Make sure you use a USB drive with available space of more than 8 GB.
That is it! On selecting the media and connecting it to the PC, you will be able to create a copy of Windows 10 Installation File on the device.
Now you can install the drive to the system on which you want to upgrade the OS. Firstly save your work and restart the PC.
Then your PC boots the USB drive. If it doesn’t happen, you would have to open a boot menu or change the boot order present in your PC’s BIOS or UEFI settings. You can press any key on the keyboard such as F12, F2, Esc or delete immediately, turn on the PC, open a boot menu, and change the boot order. On doing this, your PC boots the USB drive.
On the Install Windows page, select your language, time, and keyboard preferences, and then select Next.
Bottom Line
Data backup often becomes a hectic task while upgrading or re-installing OS. This article explains how to use the Media creation tool to upgrade the OS with no data loss on the system. We believe this process helps you in reducing the time of installation. If you find this article helpful, do let us know in the comment section.