When your job involves long term tasks or a lot of miscellaneous work, it can be easy to make management omissions and confusion by relying on yourmemory only. Inthiscase, writing all the important things down systematically seems like a good idea cause you can easily find what needs to be done by what time.

For this purpose,you better use some powerful office software such as Microsoft Office Excel. It has so many features that you can hardly thoroughly understand. So I’d like to introduce some Exceltips and tricks here to help you manage your work more effectively.
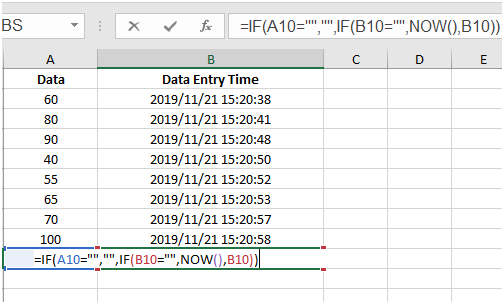
Insertthe Data Entry Time Automatically
If your job requires continuous data entry, your data base will definitely get larger and larger, and it’s difficult to tell which data was entered on which day.In this case, if you can automatically insert the entry time in the table, it will be much easier to look it up later.
- Open a new file, createa column to enter the main data (column A), and another column beside it to record the data entry time (column B).
- Enter the formula =IF(A2=””,””,IF(B2=””,NOW(),B2)) in B2. A2 refers to the cell you will enter the data and B2 refers to the cell to display the data entry time.
- Use fill handle to apply the formula to the entire column.
- Click [File] – [Options], and check [Enable iteractive calculation] in [Formulas]tab.
- Select the whole column and right-click the selected area, choose [Format Cells…] in the menu.
- Choose[Custom] in the list of[Category] under [Number] tab, then manually enter the time format: yyyy/mm/dd hh:mm:ss in the textbox. If you don’t need the specific time, just remove the “hh:mm:ss” part.
- Then you can enter the data in the first column, the data entry time will be displayed beside it automatically.
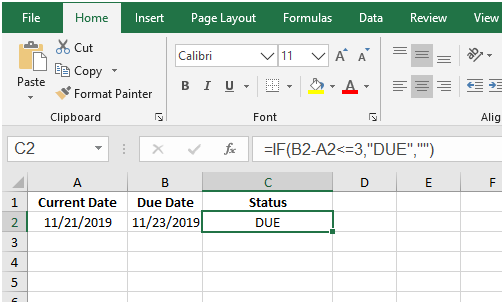
Create aDue Date Reminder
Some jobs are time-sensitive and you may need a reminder to enhance your sense of urgency and get things done before the due date. Then try adding a reminder to your Excel sheet. It will alert you before the due date coming.
- Create 3 columnsinyour Excel spreadsheet to enter thecurrent date (A), due date (B) and display the reminder message (C) separately.
- Input the formula=TODAY() in the current date column (A2) to insert the current date. It will be updated automatically every time you open the spreadsheet.
- Input your due date in the due date column (B2) directly.
- Insert the formula =IF(B2-A2<=3,”DUE”,””) in the reminder column (C2). It means when the result of B2-A2 is less than or equals to 3, the message”DUE” will show in the cell. You can change both of the time and the message as you like.
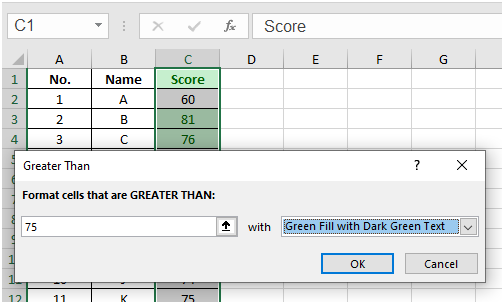
Apply Color to Specific Cells by Conditional Formatting
In an Excel spreadsheet containing a huge amount of data, it can be very time-consuming to screen out the data thatmatch some specific criteria.For example, if you need to highlight all the data that greater than a specific amount, using Conditional Formatting can significantly save your effort.
- Select the whole data base and click [Conditional Formatting] in [Home] tab.
- Click [Highlight Cell Rules] – [Greater Than…]
- Enter an exact amount and choose a format color from the drop-down menu, click [OK] to implement it. You can also click [New Rule] to create a new criteria and corresponding format style.
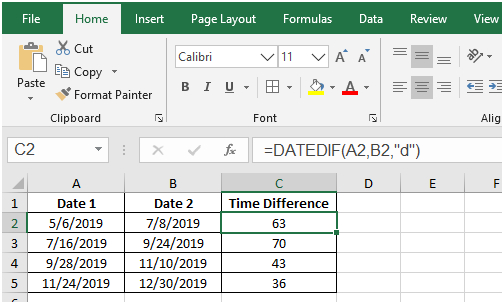
Calculatethe Time Difference
When managing work tasks, you may need to calculate thetimedifference between two time points in order to plan the next step.So instead of countingit yourself, let excel do it for you.
- Assuming there are 2 columns with different time points (dates), you can create a new column beside them to output the time difference.
- Enter the formula in the new column, click anywhere else or press [Enter] to work it out. The basic formula is: =DATEDIF(A2,B2,”d”)
A2, B2 refer to the cells with the 2 different dates.“d” refers to days.
If you want to calculate the difference of months or even years, just instead “d” with “m” or “y” accordingly.
- Then use fill handle to apply the formula to other cells, thus you can calculate the time differences between the 2 columns in batch.
Calculate the Week Numbers
When scheduling work, you may need to calculate what day of the week is some day, or exclude the nonworking days from the plan, which can be cumbersome to do manually. In fact, you can complete the calculationvery easilywith Excel formula.
- Create a new column (column B)of the week numbers beside the column of dates (column A).
- Enter the formula=TEXT(A2,”AAAA”) in B2 to calculate the week number of the date in A2. Then press [Enter] key to work it out.
- Use fill handle to apply this formula to the entire column.
- If you want to filter all the weekends out, select the entire column B (including the header) and go to [Data] tab, choose [Filter].
- You will find a small triangle beside the first cell in the selected range. Click it, check only [Monday] to [Friday]. Then hit [OK] to confirm it.

Microsoft Excel is a powerful office software. Making the best of it, you can definitely do better at planning and managing your work.