Believe it or not, a handrail offers lifesaving support in some situations. Most accidents that take place at home are usually related to the staircase. If you don’t have a handrail, you should install one ASAP. How can you install a handrail?
Well, if you have the above doubt in mind, read this blog. Here, you’ll find it easy to implement instructions for installing a wooden handrail. So, without further ado, let’s get started.
What things do you need for installing a wooden handrail?
There are some common things you need if you want to install a handrail at home. The first thing you need is a wooden rail. However, before that, you need to measure the length of the stairs from top to bottom. You can do that with a tape measure.
Here are other tools and materials you’ll need for the project: –
- Level
- Mitre box
- Stud finder
- Screwdriver
- Tape measure
- Miter saw
- Stainless steel clamps
- Safety glasses
- Drill
- Awl
- Handrail bracket
- Combination square
- Chalk line
All of the above items are available at a local store. So, you won’t have to switch shops to find all of these items.
Please note: Make sure to buy a good bracket like handrail bracket Stainless steel. It’s because stainless steel brackets are good enough to bear more weight. So, buy a high-quality stainless-steel handrail bracket.
Steps for Installing a wooden handrail on the wall
Here are some easy to implement steps you need to follow:
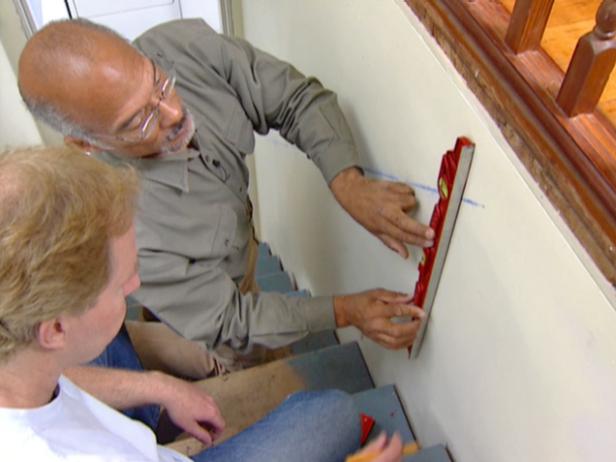
Step No. 1: Take basic measurements and mark locations.
First of all, you need to check for the local building codes for handrail height. It’s because you cannot design a handrail at a height that exceeds the permissible limit. Once you get the measure, use chalk to mark at the top and bottom of the staircase.
Once you see two marks join them using a chalk line. Now you’ll need a stud finder to locate the wall studs. It’s important to locate studs as they help in easy attachment of the handrail. Now, you’ll need a level for marking the bracket location. It’s to ensure that they’re plumb.
Step No. 2: Mounting Brackets and Clamping the railing.
This step will require an extra hand. You need someone to hold the railing right over the chalk line. Make sure that the railing is at the correct height from the ground. Once you have the rail in line, place the brackets on the wall.
Now, you need to punch holes in the wall through the bracket’s mounting holes. You’ll need an awl to punch in the holes. You now have to drill the pilot holes and mount those brackets on the wall. Now clamp the longer railing with the brackets, after that position the shorter piece using a level.
Step No. 3: Cutting the Rail Ends
You need to be quite cautious in this step. Here you’ll have to cut the rail ends. And to mark the angles, you’ll need a combination square. After that, you need to join the ends of the railing. And for this, you’ll have to make a paper template of the angle required to attach both ends.
For accuracy, cut both pieces using a handsaw at the same time. Now, you need to cut the lower and upper end of the railing. For this, you’ll have to use a mitre box. A mitre box is a cutting tool that helps in angled cutting. So, using a mitre box, you can cut the ends at a 45-degree angle.
After that, you’ll have to measure the return pieces and then cut them. The return pieces are the materials or pieces that return to the wall. Click here to check the return to the wall pieces.
Final Step No.4 Attaching the Rail and Returns
Its time for the final steel. You need a strong glue for this. Spread glue evenly on the returns and rail ends. Now, you need to attach the returns. For better grip use L-brackets. After that, you need to evenly spread glue on the top end of the short and long rail.
Now connect the short with the wall brackets. Till the time the glue dries tape the railing to secure the joint. Once the glue dries place a metal plate to reinforce the joint.
Wrapping up!
We hope the above info was good enough to help you install the wooden handrail. The overall procedure is very simple. All you need is some supervision and guidance. Please make sure to through the steps once again for deep understanding. Also, visit the list of tools and materials you’ll need for the procedure.
However, if you think it is too risky to handle the tools, call for an expert. A carpenter will help you get the handrail installed in a few hours. Also, it’s a more reliable option.