With the amazing low-light capabilities of digital cameras and even smartphones these days, it’s a great time to explore nighttime photography. Shooting at night with only artificial lights to illuminate the landscape provides a completely new way of seeing and exploring an environment. My experience of nighttime shooting is mostly cityscapes which I’ve always found to provide an interesting new perspective when seen at night. You can play with light trails or leave the shutter to open to allow for as much light as possible to hit the sensor. There’s a great deal that a camera can reveal at night which is obviously impossible to see by human eye.
1 – Tripod
Perhaps the most important gear for night photography (apart from the actual camera of course!) is a tripod. It’s absolutely essential for night shots as you need to keep the camera still for the long shutter releases. Of course you could decide to play around with the format and experiment with handheld shots – freedom is the beauty of photography! Although, if you want any detail, it’s necessary to use a tripod in most cases. Having said that, the capacity of recent digital cameras to shoot at high ISOs and retain clarity and detail without noise is extremely impressive.
For the majority of cameras though, you’ll still need a tripod to get the most out of a low-light situation – it simply reduces any shakes or vibrations and allows for the shutter to stay open allowing more light in which translates to clarity and no noise. Be sure to test your camera’s ISO abilities to get an idea of where its limit may be in terms of a grainy or clear image. A lot of professional photographers will also use a remote shutter trigger to remove any movement of the camera whatsoever.
2 – Manual Mode
As touched on briefly above, shooting at night basically means that you’ll need to get comfortable with shooting in manual mode. A lot of modern mirrorless or DSLR cameras will have a night mode which is certainly a viable option but I would really recommend trying out a few shots with manual to get a feel for what apertures, ISOs and shutter speeds work given the low light. Another manual feature you’ll likely need to manually focus the camera too. Choose a lit spot in the distance and lock your focus to that distance, this way you have a good idea of what will be in focus in the frame.
3 – Shooting in RAW
This is especially relevant for nighttime photography as it will ensure that you get as much data from the shot as possible. So if you need to adjust white balance or want to reduce shadow to get some more details, shooting in RAW is the way to go. It simply provides more options and flexibility with how you want the final picture to turn out. It especially helps with adjusting white balance to get a more natural tone and ambience which can get lost when your light sources are artificial street lights.
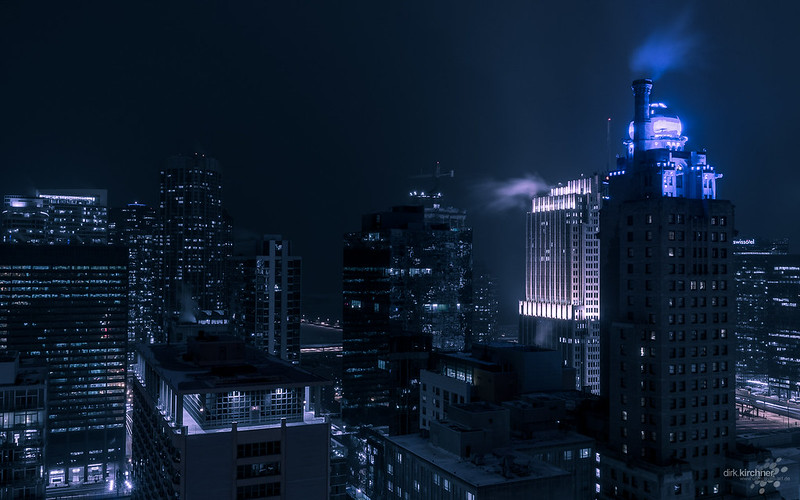
The above photo is a good example of how colour temperature can be manipulated in the edit – this is definitely more blue than you might expect to see in reality but it also makes for a visually appealing image.
4 – Repeat Exposures
In my experience shooting at night can often lead to out of focus, too dark or over exposed (thanks to long shutter release and street lights) images. It’s worth taking a number of shots with slight changes to try and get as close to the picture in your head as possible. Another reason is that, in my own experience, it’s hard to get a good idea of the final image on the LCD screen (even more so than usual). By taking multiple exposures at different apertures or ISOs, it gives you more chances to get the shot. Multiple exposures also help to give you a better idea of what works and what doesn’t with your camera.
5 – Bulb Mode
This is how it’s possible to get light trails and other effects at night. Most digital cameras will offer this mode which gives you control over how long the shutter stays open and therefore how much light you allow into the sensor. For long exposures it’s recommended to set the aperture to f8 or higher to make sure that the shot doesn’t become overexposed with such a long shutter release. This is the mode for ‘light’ painting, if you have any torches or lights you can create fun patterns or write words that will become clear in the final frame.
Although I’ve not gone into astrophotography because it’s another topic completely, you can also capture star trails and shooting stars making their way across the night sky! This is of course a little more technical than simply pointing at the night sky and putting the camera on bulb mode but there’s no harm in trying!
Hopefully these tips and tricks have served to provide some insight and inspiration to explore night photography. As always; practise makes perfect and shooting at night is no different, it’s a wonderful opportunity to further investigate and discover what kind of images can be made with low-light conditions.
Author Bio:
Andrew Farron works for Fable Studios, a Creative-led boutique video and animation studio that creates tailored brand stories that endure in your audience’s mind. Fable combines your objectives with audience insights and inspired ideas to create unforgettable productions that tell the unique story of your brand.