Owning a desktop PC means that the user needs to have in-depth knowledge of not only the software used in it but also of the hardware used in its making. This means you have to be familiar with the different components of your PC as well as should be able to dismantle and install it back together whenever the need call for it. The main and the most important part of a desktop PC is the motherboard which can also be called the backbone of your PC. All the components that the PC is made up of are plugged into the motherboard to make the usable so it is imperative that the installation of the motherboard is done without a glitch.
Following is a stepwise installation guide for your motherboard which will ensure that your PC is on its way to being built in the right manner:
- Opening the computer case:
It is advisable to remove the side panels on both the sides. This will allow you to easily access the motherboard tray on which you have to work. Many motherboard cases may be removable and many may be not, but if in case your motherboard tray is removable, remove the tray out of the case to avoid working at weird angles while installing the motherboard. There are two screws that hold the motherboard tray. To avoid hassles later on safely keep them aside.
- Ensure that you are grounded:
Installing a motherboard means working around electricity. During such a situation it is essential for a person to ground themselves to prevent large-scale shocks which are entirely possible. Thus, before starting to work on the insides of the motherboard or on the motherboard itself, it is necessary to ensure that you have discharged any electrostatic charge you may be carrying which can be done by touching a water tap. There are antistatic wrist straps available in the market which you can wear while working on the motherboard which helps avoid electrostatic damage.
- Replacing the I/O panel shield:
The I/O panel shield is located at the back of the wire to wire connector from the motherboard to the monitor, USB devices, and the various other peripherals are extended. Almost all the cases will have a default panel shield installed which you will have to remove and replace it with the panel that was made available with your motherboard. The panel will snap onto its place when you will apply pressure on all the four corners which will keep it secure. Ensure that the direction of the panel you are installing is correct. This can be assured by comparing it to the layout of the scondar connectors on the motherboard itself.
- Look for the standoffs:
Some cases are made available with standoffs and some are not. The role of standoffs is to keep the motherboard above the case to avoid shorting as well as circulating air to keep the motherboard cool.
- Install the stand-offs:
Every other case and the motherboard tray are different and hence the hole configuration of them will be different. Match as many holes as possible on the motherboard tray with the standoff locations on the tray. Usually, the standoffs are supposed to screw into the holes but some might have to be pushed in like pegs. As we said the tray and the case might be different but ensure that all the holes in the motherboard have a corresponding standoff in the tray.
- Settling the motherboard on the stand-off:
Ensure that the holes and the standoffs are all lining up properly. There might be a case where your motherboard does not come out of the case. At such times, you might have to gently push the motherboard against the I/O panel to fit it in and then you can start securing the motherboard with screws. Keep in mind not to secure the screws too tightly and also do not use an electric screwdriver. It is best to avoid non-metallic holes.
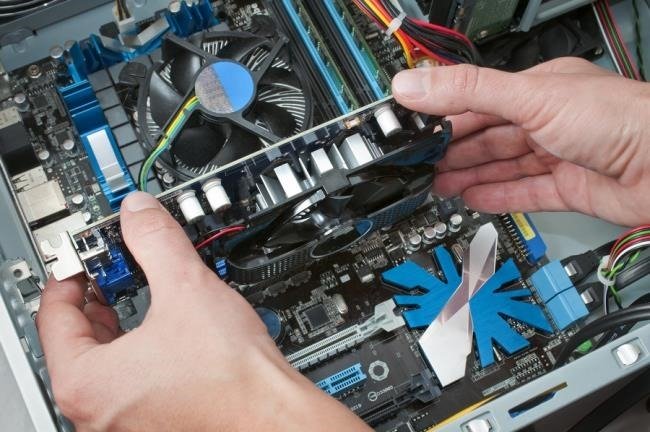
- Installing the components:
After you finish fastening the motherboard into the case you will have to re-insert the motherboard tray. But before that, it is advisable to install the CPU, CPU cooler, and the RAM as it would be much easier to reach everything inside. If yours is a motherboard tray which is not removable, finish the wiring and then install the components.
- Getting the power supply connected:
After securing the motherboard, connect all the components. It is vital to connect the power supply first as it will be difficult to reach them later. Ensure that the 20/24- pin connector and the 4/8-pin 12V connector is attached. It is always safer to refer to the power supply documents to be sure about the cables being used to avoid disaster.
- Connecting the front panel:
For your PC to be turned be booted with the front power button you will have to connect the front panel switches and indicators. Locate the wires for the power switch, reset switch, power LED, hard drive and speaker and connect them to the appropriate pins on the motherboard.
- Ensure connecting the front USB ports:
The USB ports are usually labeled. You will just have to ensure that the right plugs are placed on the right pints.
- Connect the fans:
You will find many places to plug in the chassis fans and also a two-pin connector situated near the CPU for the CPU fan. Just ensure the connection of the appropriate pins to the motherboard.
- Installing the drives:
Now is the time to start attaching the drives of the PC. Here, you will just have to ensure that the SATA hard drives, as well as the optical hard drives, are connected to the right SATA port.
- Video card installation:
The Video card is the last component that should be installed as it takes up most of the space which makes it difficult for the installer to reach other areas.
- Adjusting the wirings:
This is a vital step as you will have to make sure that the heat emanating from the CPU does not get stuck in the wiring and damage them. Ensure that all the components have breathable space.
- Close the computer:
On this final stage, the side panels of the case have to return to their original position and ensure they stay there by screwing them back in. Next, you will have to plug your PC and all its components in and boot the PC. If all the steps above would have been performed correctly then your computer will start and then you can go ahead with the operating system installation.
The above steps are very easy to follow and it would not be long before you have installed the motherboard on your PC.